
Cutting directions for making a 3D Hexagon Table Runner

After picking your 3 fabrics, a dark, a medium, and a light, you want to make sure you are cutting your pieces accurately. Click here to go to the 3D Hexagon Table Runner Supply List Fabric Requirements.


You will need:
Cutting Mat, 24" or larger - make sure the lines on the mat are accurate, and there are no warps in the mat.
Rotary Cutter - Sharp blade, makes life easier.
Rulers - 1.) 60° triangle ruler, 2.) square ruler 6 1/2 " or larger, 3.) 24" long ruler for cutting strips.
Starch
Iron
Ironing Board/Pad
Cutting Mat, 24" or larger - make sure the lines on the mat are accurate, and there are no warps in the mat.
Rotary Cutter - Sharp blade, makes life easier.
Rulers - 1.) 60° triangle ruler, 2.) square ruler 6 1/2 " or larger, 3.) 24" long ruler for cutting strips.
Starch
Iron
Ironing Board/Pad
Pressing
Because 60° Triangles, Diamonds and Hexagons are made by sewing on biased edges, it is highly recommended that you starch your fabric. The starch will help adhere the fibers in your fabric together so that when you are working with the pieces, the fraying and stretching of the cut pieces will be reduced.
You will only need to Starch and Press a section that is about 10" - 12" wide.
Start by folding your fabric pieces in half, lining up the selvages. Lay folded fabric on ironing board and lightly spray fabric with starch. Give the fabric a few seconds to absorb the starch and lightly press fabrics flat with your iron. Take care to press the fabric by lifting up your iron and moving it to a new location and you do not stretch the fabric.


Flip folded fabric over and starch the other side by repeating the step above.
You want to Starch and Press all three pieces of fabric.
Cutting
Squaring up your fabric-
Squaring up your fabric-
Because most standard quilting fabric is 42" to 44" wide, you will be able to make two 3D Hexagons from one strip of fabric. **If using Batik fabric, you should be able to make 3 Hexagons from one strip.** We want to cut 2 strips of fabric from each of the three selected fabrics to make three hexagons for the table runner.
Start by laying your fabric on your mat (with your mat arranged so that the whole piece of fabric (from fold to selvage) will lay on the mat. You want the bulk of your yardage out to your left with the pressed side to your right (reverse if you are left handed). You want to lay the folded side of the fabric closest to you, with the selvage edge away from you.


Line up the fold in your fabric with the straight horizontal line on the mat (red line). At the same time - making sure the somewhat vertical raw edge of the fabric (blue line) extends to the right side of a vertical line on the mat (in the picture, the fabric extends past the vertical line #17).


The first cut you make will square up your fabric, so that when you cut strips in the next step, your strips by width of fabric will be straight when you unfold them.
Place your long ruler on your fabric, the cutting edge of your ruler close to the raw edge of your fabric. Line up the lines on the top and bottom of your ruler (blue arrow) with the top and bottom lines on your mat. Check to make sure your fabric is extended slightly past the cutting edge of your ruler.


Measure twice, cut once. Double check everything is as it should be and cut off the wonky edge of fabric with your rotary cutter. Now you have a nice square piece of fabric ready for you to cut strips off.


**Take care to ensure the rest of your fabric doesn't shift during or after you cut your fabric**
Making 3" by Width of Fabric strips
Gently lift your ruler off your fabric and move it to the left by 3".
Line up the lines on the top and bottom of your ruler with the top and bottom lines on your mat. Double check to make sure you have counted exactly 3".


Cut off your first 3" strip. Hold your ruler in place and slide your 3" strip away to ensure the fabric cut through both layers of your fabric. If it did not cut all the way through, it might be time for a new blade.


**Take care to ensure the rest of your fabric doesn't shift during or after you cut your fabric**
Repeat 'Making 3" by Width of Fabric' steps above and cut off your second 3" strip of fabric.


You now have two strips of fabric that measure 3".
Repeat 'Making 3" by Width of Fabric' steps above with the two other fabrics so that you end up with a total of 6 strips of fabric: 2 darks, 2 mediums, and 2 lights.
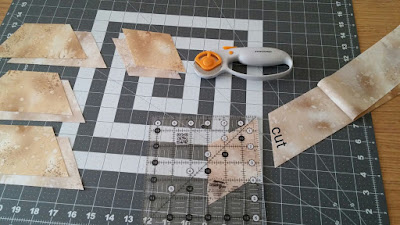
Making Half Hexagons and 60° Diamonds (reverse direction in steps below if cutting lefthanded)
Half Hexies-
Half Hexies-
Lay out your strip (still folded in half) on your mat. You want the selvages to your left and the fold to your right.


You want to lay your 60° triangle ruler on top of your strip, as close to the selvage end (without being over the selvage), lining up the 5 1/2" line with the bottom of your strip and the 2 1/2" line with the top of your strip.


Use your rotary cutter and cut on both sides of the ruler. You now have 2 hexagons.


Rotate (not flip over) your ruler to where it is upside-down and line up your ruler on the remaining strip. Line up 3 points; the 5 1/2" line, the 2 1/2" line, AND line up the left edge of your ruler with the cut edge from your previous cut. Cut on the right side of your ruler. You now have 4 hexagons.


Rotate your ruler once again rightside-up and line up your ruler on the remaining strip: line up 3 points; the 5 1/2" line, the 2 1/2" line, AND line up the left edge of your ruler with the cut edge from your previous cut. Cut on the right side of your ruler. You now have 6 hexagons.


Diamonds-
With the remaining strip of fabric, you want to take your square ruler and line up the 3" line (red arrow) with the left edge of the strip.

With the remaining strip of fabric, you want to take your square ruler and line up the 3" line (red arrow) with the left edge of the strip.

Cut. You now have 2 diamonds.


You can see if the remaining strip piece will give you one more diamond. **I like to save as much fabric and create as little waste as I can.** Unfold the piece and line up the 3" line on the ruler with the left edge of the fabric. With this particular fabric, I cannot get another diamond. There is a large chunk of fabric missing on the bottom tip of my diamond. This is why you cut a second 3" strip.


Lay your second 3" strip of fabric on your mat. Since we only need one more diamond, you want to unfold the strip so you only cut one more diamond. The rest of the strip can be used as the binding.


Lay your 60° triangle ruler on your strip and line up the 5 1/2" line with the bottom of your strip, and the left edge of your ruler as close to the selvage side of your fabric strip (without being over the selvage). You only want to cut off the selvage side of the ruler.


Now using your square ruler you want to line up your 3" line with the left edge of your fabric strip. *For an easier angle to cut, move your strip at an angle, like pictured below* Cut.

You now have 3 diamonds, one for each pair of half hexagons.

You want to repeat the steps for 'Making Half Hexagons and 60° Diamonds' with your other two fabrics. In the end, you will have three sets: 6 half hexies, 3 diamonds which each set contining the three fabrics.


Take a preview at what your hexagon will look like by laying one set out as pictured here...


No comments:
Post a Comment