This tutorial assumes you have already fused your applique fabric to the background fabric. For this tutorial, I will be using several different template shapes to show you layers, curves, corners, and other such techniques.
These directions are written to show you how to use the Satin Stitch.
The major difference when using satin stitch and blanket stitch; a stabilizer is needed to keep the fabric from puckering when using a satin stitch. If you wish to use any other fancy stitch, omit the steps for stabilizers.
Things you will need:
- Matching Top and Bobbin Thread - if you plan to use 5 colors of thread, have a bobbin to match each color.
- Open Toe Presser Foot (optional but extremely helpful)
Stabilizing
I prefer to iron on freezer paper to the back of my applique project for a stabilizer, it is cheaper and works perfectly for the job. Feel free to use the stabilizer you like. Cut a square of freezer paper - large enough to fit about 1" around the applique pieces you are going to be working on. With high heat, iron freezer paper to the back of your background fabric.
Sewing Machine Tension
First, remember the tension number your machine is set to so you can change it back after you are done with the applique.
It is good to write it down or take a picture with your mobile device.
Turn the tension dial on your machine to a lower number (about 2 numbers), this allows the top thread to be pulled under. This will give you a smoother stitch on top. See bottom thread sample to the right.
Test a couple of zig-zag lines to get the right tension. I used a thread of two different colors so you can see the difference.
Satin or Blanket Stitch
Set machine to a zig-zag stitch.
Set the width of the stitch to number 2mm, 2.5mm or 3mm, pick your preference.
Set the length of the stitch to a .3mm or a .2mm.
Depending on what my project 'calls for', I like to use a 2mm or 2.5mm width, and a .2mm length for my satin stitch.
For a blanket stitch on the machine, look for the stitch that looks like a bunch of sideways Ts.
The trunk fo the "T" will be pointing to he left and the top of the "T" will form a straight line on the right.
When setting your length and width for the blanket stitch, keep in mind you do not want your width to be so wide that it covers too much of your fabric, but not to narrow that it doesn't catch enough of your fabric.
For my blanket stitch applique, I like to use a 2.5mm width, the trunk of the "T" is 2mm apart (length".
Since all machines are different, adjust your tension, stitch width, and stitch length until you have a stitch that appeals to you.
Practice - Leave about 2 to 3 inches of thread tails when you start and when you stop.
Stitching - Pre-planning
 When you are practicing - observe where the needle falls when you stop - is it on the left or the right side of the zig-zag? this will determine where you start next.
I prefer to stop with my needle so that when I start, I know it will be on the right when I begin again.
Look at your applique project. are there layers? Plan to stitch on the lowest layer first.
If there are layers, start stitches next to the layer above. If there are not any layers, plan to start in the middle of a long edge, it is not recommended to start on a corner.
The first needle down needs to be on the layer above the layer you are stitching. This way, your beginning stitches will be sewn over as you move up each applique layer - you will only have to knot to secure the threads of the last layer stitches. End your stitches the same way, on top of the layer above.
Stitching Outside Curves - curves to the left.
Starting with the lowest layer, place the needle down in/on the layer above. start on the right (outside) edge.
The outside stitches need to be one thread width away from your fabric - not on the layer you are stitching. See the diagram to the left.
Lower the presser foot and hold your applique work firmly with your hands. as you stitch, you will guide the fabric with your hands around the edge.
When you get to a curve, stop sewing with the needle down, lift the presser foot and turn your block ever so slightly, lower your presser foot and stitch a couple more stitches.
Repeat as you stitch your way around.
Shorter curves may only need one or two stitches before you need to stop with the needle down, lift the presser foot, and turn your block.
Larger and longer curves can be made without lifting the presser foot - but save that until you have practice.
Reminder: Leave about 2+ inches of beginning and ending tail threads.
Stitching Inside Curves - curves to the right
Stitching inside curves is very similar to outside curves, the only difference is stopping with the needle down on the inside of the layer being stitched, lift the presser foot, and turn the fabric.
Hiding Thread Tails
With each beginning and end, you will have thread tails.
Thread a needle with the thread tail that is on the front of the block.
Insert the threaded needle right next to where the tail starts and pull the needle through to the back of your block.
Self-threading needles come in handy here.
 The Next Layer
When moving to the next layer up, start on the edge where the layer above and the current working layer meet.
Stitching Outside Corners
When you come upon an outside corner (from the direction of the light blue arrow), sew all the way to the corner where your needle stops one thread width away from the outside of the corner.
It is almost like you stitch one thread width past the corner (see red dot).
Lift presser foot up and rotate your block until the straight edge is lined up with your needle and continue.
Stitching Inside Corners
When you come upon an inside corner (from the direction of the light blue arrow), sew all the way past the corner where your needle down stops one stitch width (notice I didn't say thread width?) away from the edge of the inside corner of the layer.
Lift presser foot up and rotate your block until the straight edge is lined up with our needle and continue stitching.
The Last Layer - or The Only Layer
The last layer stitches can be started anywhere except a corner (it does not look as pretty when started in the corners).
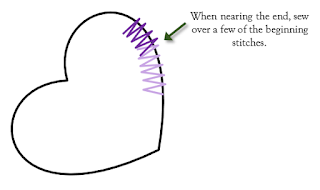
When nearing the beginning stitch of the last layer, sew over a few of the beginning stitches before stopping.

Hide the thread tails to the back and tie a double knot.
Things to remember:
- Always stop sewing with the needle down.
- Your hands guide the fabric, not the machine.
- Test stitches on scraps with new thread change.


Good work.
ReplyDelete