
Welcome to A
3D Hexagon - Easy Y Seams
Table Runner Project
Part 3 of 3
By Paco Rich
It is important that you read through every part, as I feel every piece of information mentioned here will help make your learning experience a great one. I am here to help you learn, so please ask me questions!!! **Click on images to see them larger...

After picking your fabrics and cutting your pieces, its time to sew them! Click here to go back to Part 1: Fabric Requirements, or here to go back to Part 2: Cutting Directions.
If you measured and marked your seams, continue on. If not, click here to go to the last step in the cutting directions.
First things first, let's set up our machine. Please take a minute and follow this link to set up your machine for sewing 60° angles.
Part 3: Easy Y Seam Assembly Directions (No Pivot Point) This list is an easy reference for you to use after you have gone through each step. Please go through each section in order.
Lets take a look at one 3D hexagon block and break it down. How many Y seams do you see?

 |
| There are four Y Seams: pink, green, yellow and red. |

Let's rotate the sections to where the diamond is on the right side, so you can start training yourself to follow a pattern.

We are going to sew one seam at a time. We want to always start with the same seam line of each section and work your way around. You will always start on the outside and sew towards the center of your section, which translates to starting with the small angle of your cut piece and stopping at the wide angle of your piece.

ALL seams are sewn with a backstitch/tackstitch at the START and STOP of each seam.
Easy Y Seam Sections
Lets start sewing!

With one section, flip over the diamond onto the 1st half hexie. Line up the edges of the wide angles of the two pieces and pin to hold in place.

Place your pinned piece on your machine, lining up your point with your line on your tape. Sew down the edge of your piece to your wide angle. REMEMBER: start and stop with a backstitch/tackstitch.


Place your sewn pieces back onto the table with your 2nd half hexie, fold open the pieces, as if you hadn't sewn the seam.

Now, to sew our second seam, we need to tuck our 1st half hexie out of the way. To do that, fold your 1st half hexie onto your diamond.

Take the small angle (red circle) of the 1st half hexie and fold it back and pin in place. The green line will line up with the edge of the seam you just sewed.


Flip your 2nd half hexie onto your diamond piece, line up the wide angle of your 2nd half hexie and your diamond and pin in place.

Now we are going to rotate our whole pinned piece because we want to start sewing at the small angle and end at the wide angle.


Sew your seam. REMEMBER: start and stop with a backstitch/tackstitch. You do not want to sew over your 1st half hexie that is tucked away.

Remove the pin that was holding your 1st half hexie and pair the edges of your 1st half hexie with the 2nd half hexie (they are right next to each other).


When you lift it off the table, your two seams you have already sewn will fold together, which causes your diamond to fold in half and essentially be 'tucked' out of the way.

Line up the edges of the wide angle of your two half hexies.

Sew them together. REMEMBER: start and stop with a backstitch/tackstitch. You do not want to sew over your diamond that is tucked away.

It is preferred that your seams do not meet, or the seams crossing. If the seams cross, that means you have sewn over one of your tucked away pieces.

Repeat with the other 2 sections.
Pressing seams
First, we are going to finger press our seams. We want to press the seams in the same 'spinning' direction. The 'spinning seams' will force our points to line up and will help reduce the bulkiness at our points. Finger press without stretching, by lifting your finger and moving it to a new location. Finger pressing our seams will give us a crease in our fabric so that when we move to the iron, we do not stretch our fabric.
Open up one Y seam section. Right side of the fabric up. Start with the 1st seam and place it on your right.

Fold the 1st half hexie over towards you so you can make your seam point away from you.

Fold your 1st half hexie away from you so you can finger press the seam. Rotate your piece to where the next seam is on your right (the seam between the two half hexies).

Fold the 2nd half hexie over towards you so you can make your seam point away from you.

Fold your 2nd half hexie away from you so you can finger press the seam. Rotate your piece to where the next seam is on your right (the seam between the 2nd half hexie and diamond).

Fold the diamond over towards you so you can make your seam point away from you. Then fold your diamond away so you can finger press your seam.


Flip over your whole Y Seam section to where the wrong side of the fabric is facing up. You can see how your seams are spinning in the same direction.

Now hold the three seams down using both hands. **I can't show you a picture with me using both my hands, as I needed one to hold the camera... :) You will see the center of your seams start to fold out and lay flat. If they do not fold out, you have likely sews over one of your "tucked away" pieces and need to rip out that stitch.


Use your finger to press the center to give it a good crease.

Press the back with your iron to set your seams. Flip over and press the top with your iron.


Do not cut off the dog ear flaps of the seams, we will use them as a guide later.

Repeat the pressing seams section for all of your Y seam sections.

Joining the 3 Sections
Now you have 3 Y Seam sections sewn together, arrange them back into your 3D hexagon. Two dark half hexies together, two medium half hexies together and two light half hexies together.

Piecing them together is essentially the same as above, with 2 differences. You are piecing together 3 diamonds instead of half hexies and you are nesting seams first, then lining up your wide angles. We want to sew our Y Seam in the same order and from the outside towards the center.

For the purpose of this tutorial, I'll number our sections.

Take section #1 and flip it over onto section #2.

Nest the two seams by sliding them up to each other. If you pressed your seams in all the same direction (as directed above), the two seams will nest up against each other (one seam going to the left {yellow arrow}, one seam going to the right {orange arrow}) and they 'lock' together. **If your seams do not line up like the picture below, take a minute to repeat the pressing seams section above to get them spinning in the right direction**

You also want to line up the raw edge of your fabric. Place a pin to hold your seam together.

**I like to place my pin across the locked seam, that way both sides of the seams are being held, and I can sew straight up and over the seam and hold the nested seams with my sewing machine needle while I remove the pin. Then, I can continue with sewing the rest of my seam.**

Like the Y Seam sections above, sew your two sections together, starting with the small angle and ending at the wide angle. REMEMBER: start and stop with a backstitch/tackstitch. You do not want to sew past your stop spot.

Lay your piece open.


Take the small angle (red circle) of section #2 and fold it back and pin in place. The green line will line up with the edge of the seam you sewed.


Flip your section #3 onto your section #1. Rotate your whole piece so you can nest your seams.


Nest your seams like above and pin into place.

Like the Y Seam sections above, sew your two sections together, starting with the small angle and ending at the wide angle. REMEMBER: start and stop with a backstitch/tackstitch. You do not want to sew over section #2 that is tucked away.


Nest your seams and pin them into place.

You also want to make sure section #1 is still tucked out of the way. Like the Y Seam sections above, sew your two sections together, starting with the small angle and ending at the wide angle. REMEMBER: start and stop with a backstitch/tackstitch. You do not want to sew over the section #1 that is tucked away.


You want to finger press your seams in the same spinning direction as you did above. Click here to go back to the Pressing Seams Section. If you've done it correctly, ALL your seams will spin in the same direction. Press the back to set your seams, flip and press the top.

Take a minute to admire your points and how well they line up. **Smiles**
Repeat the Y Seam steps above for your 2 remaining 3D Hexagons.
Decide on a Layout
Our brains see depth and distance through lights, shadows and darkness.
Check out these photos. It's the same block - but the arrangement of those lights/mediums/darks, changes how our brain sees them. The diamond piece on top makes our brain think the cube is sticking out, and the diamond on the bottom of the cube makes our brain think it's sunkin inwards.


If you haven't already, turn your blocks around, play with your blocks, decide the layout you like best. I am going with the the light diamond on top/bottom. **Same photo, just rotated around.


What ever layout you decided - light, medium, or dark diamond on top/bottom, you want to cut your 2 triangles from each of the other two fabrics. Example; I went with the light diamond, I want to cut 2 triangles from my dark fabric and 2 triangles from my medium fabric.

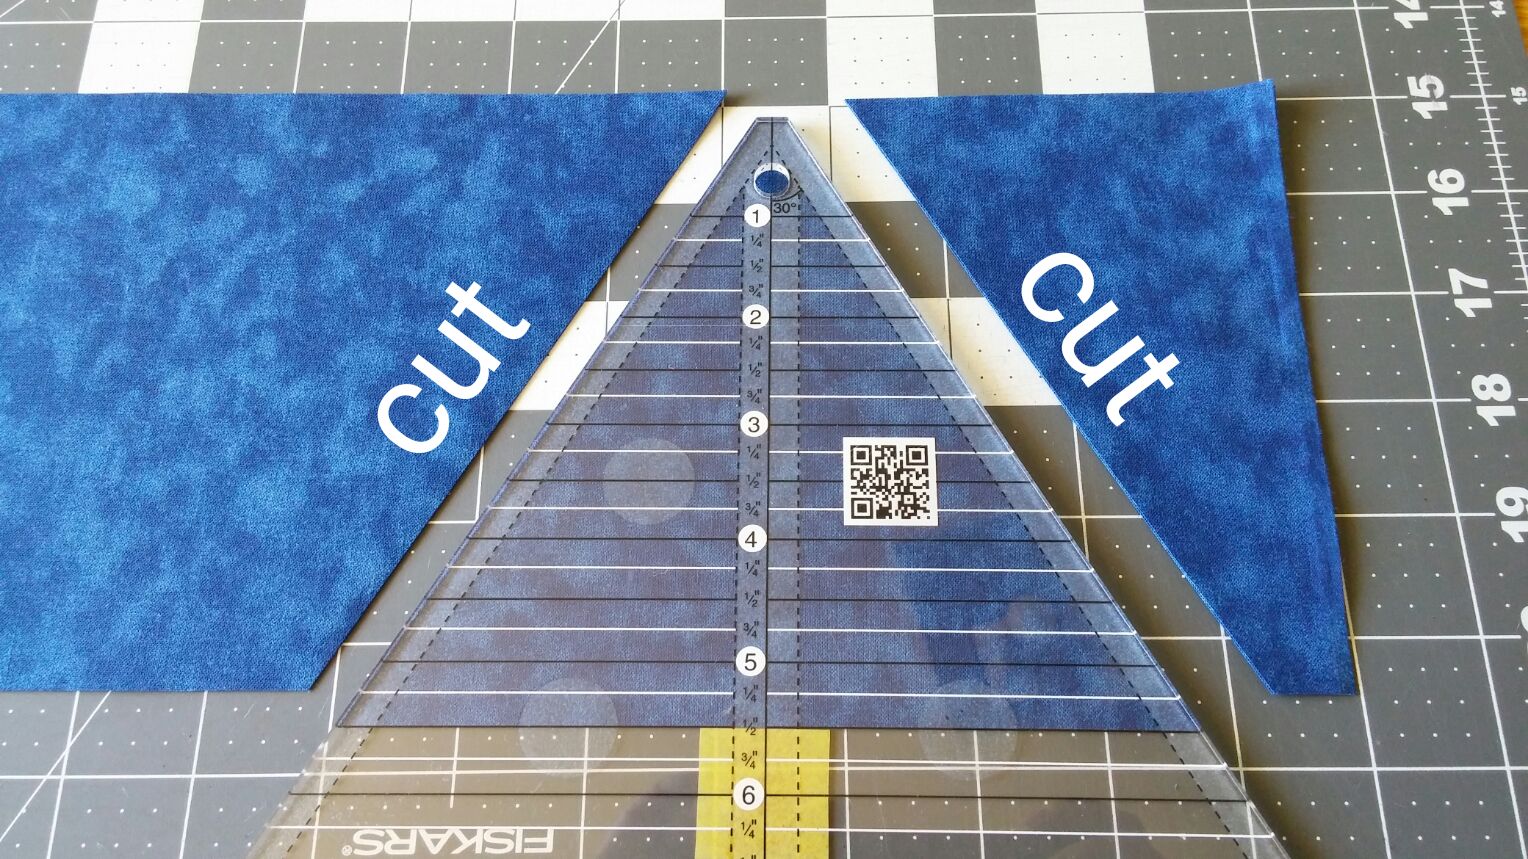
Cut a strip of fabric that measures 5 1/2" wide from each of your 2 chosen fabrics.
Triangle - Method #1 - with a 60° triangle ruler (2 triangles from 2 fabrics - 4 triangles total)
Lay your strip of fabric on your mat, still folded in half. Place your ruler on your strip, lining up the 5 1/2" (or the line you figured out from Part 2 that works with your ruler). Cut on both sides of your ruler, and you now have 2 triangles. Repeat with other chosen fabric.
Triangle - Method #2 - with the 60° line on a square/rectangle ruler (2 triangles from 2 fabrics - 4 triangles total)
Lay your strip of fabric on your mat and cut 2 rectangles that measures 6 5/8" x 5 1/2". If you leave your 5 1/2" strip folded in half, you can cut out 2 rectangles at a time.
Line up the corner of your ruler with the bottom corner of your rectangle fabric, at the same time line up your 60° line on your ruler with the bottom edge of your fabric and cut.

Lift up your ruler and flip (not rotate) your two fabric pieces horizontally. Line up your ruler the same as above, and cut.

Repeat with other chosen fabric.
Joining the Hexagon Blocks
Place your blocks and add the cut triangles to the spot opposite its like fabric.

Seperate the Hexagons, so that we sew the triangle to different parts of the hexagon.

Fold over triangle pieces onto the hexagon.

Line up the point of your triangle with the dog ear points from the seams of the hexagons (remember, I said not to cut them off). The flat tip of your triangle "should be" flush with the edge of your hexagon.

REMEMBER: start and stop with a backstitch/tackstitch. You do not want to sew off the edge of the fabric, you want to start and stop at your seam intersections like all the piecing you've done above.

Repeat with all the triangle pieces. Press your seams in the same spinning direction as the seams on your hexagon.


Now when we lay our pieces back out, we have a straight line to sew.

Fold over your top hexagon onto your middle hexagon like so. Your seam lines from your top piece will nest together with the middle hexagon AND your points will line up also. Pin your nested seams and sew.

Press your seams in the same spinning direction.

Your seam intersection point will fold out to reduce the bulk at the seams.

Repeat the process with the lower section of the runner. Nest the seams, Pin, Sew and press the seams as you did above.

Use a long ruler to square up your sides. Your top is now complete!

This project has been a blast for me,
and I hope you have enjoyed it
as much as I have.
I can't wait to see what else you make!
and I hope you have enjoyed it
as much as I have.
I can't wait to see what else you make!
Muito lindo vou comprar os tecidos imediatamente e tentar executar.
ReplyDeleteobrigada
You are welcome. Would love to see when you make it.
Deletede nada. Adoraria ver quando você faz isso.
This is a fabulous tutorial. Patiently waiting to gather some fabric. Thank-you, so much!
ReplyDeleteYou're welcome! I hope you enjoy. :) if you need any help, let me know.
DeleteThank you "sew" much for your very detailed tutorial. I made one of these.
ReplyDeleteAwesome Jeanne! I would love to see it! lifesaquilt.laq@gmail.com
DeleteDo you have a book somewhere with all this already printed? I actually understand this tutorial!
ReplyDeleteI do have a version that is slightly different, for a horizontal table runner, that is printer friendly. You are welcomed to join our facebook quilting group called Life's A Quilt to get your copy :)
Deletehttps://www.facebook.com/groups/1080959058629633
Thank You!! I'll head over now.
DeleteTerri
Hope this is not a repeat. Looks like my first comment did not go through. Trying to decide what to do next. I have the top finished. I am very new to quilting and do not know how to finish. I have a Brother Dream Machine that does stippling and also decorative quilt designs. Any suggestions. Also, did you use purchased binding or cut solid fabric on the bias to bind. Thank you
ReplyDeleteHi Fay! I'm so happy you made the 3D Hexagon table runner top! I would love to see your beautiful creation, feel free to join our Facebook group, Life's A Quilt to show it off. The group is always so helpful, they could even give you tips on how to finish the top off. :)
DeleteI believe biased binding is used more for curved edges, so I have never had the need for it. All my binding has been made very similar to the tutorial by Cluck Cluck Sew - Machine Binding Tutorial.
There are many tutorials out there on "Sandwiching a Quilt", "Beginner Machine Quilting" and & "How to bind a quilt". Quite a bit of Jenny Doan's videos over at MSQC are pretty easy to follow. Leah Day does a phenomenal job at showing how to do machine quilting. Just a few of the ladies I learned from once upon a time...
Apologies for taking so long to respond. It's been a busy county fair week! Looking forward to hearing more of your journey!
So excited to find your tutorial. I am going out to get my fabric and make one. Hopefully when I do it it will become more clear as to each step of sewing it together. The cutting I get but the sewing together looks a little more complicated. Wish me luck.
ReplyDeleteThat is so cool! Happy you found it. If you come across any questions, feel free to join Life's A Quilt facebook group and I would be happy to help you through any hiccups you may encounter 💚
ReplyDeleteI know I'm very late but I want to make a quilt. This pattern is amazing. How do I make the ends squared. I saw one of your students had made hers that way.
ReplyDeleteHi! I'm glad you're interested. I would use the 60° tringle ruler and cut out half a tringle with the seam allowance added on. Creative grids 60° rulers have a solid line down the center, but they also have a ditted line slightly off centered to add a seam allowance.
DeleteIf you'd like some additional guidance with photos, feel free to join the Facebook quilt group called: Life's A Quilt. I'd be happy to help you. :) just mention this comment.
Buenas tardes ,feliz de haberla encontrado no se como me había perdido de estas maravillosas enseñanzas, me fascina el patchwork ,Dios bendiga sus manos.
ReplyDelete
DeleteI'm happy you found it! Happy Quilting!
Muy bello su tutorial bien explicado lo hice y a la primera me salio. Lo que cuesta es imprimirlo por lo largo ya que no he podido memorizar todos los pasos aún. Muchas gracias
ReplyDeleteYou're Welcome! I would love to see your quilt. I knew the directions and photos would make it a long tutoeial. It is my main reason to make it a web page instead of being printable. I was hoping one can have it open on their phone while following along.
DeleteWhere can I get the printed copy of this pattern please
ReplyDeleteHi! There is not a printed version of this runner. It is just too long. I have an edited version of the block placed side by side - but still long, but it is only available to Life's A Quilt Members.
ReplyDeleteThank you so much for your excellent clear step-by-step instructions. I have been spending a lot (too much) time looking for tumbling block how-to’s. And yours is by far the best.
ReplyDeleteYou're welcome! If you need any assistance, let me know.
DeleteCould you please provide the size of the finished block? Couldn't find it,
ReplyDeleteAbsolutely. In Part 1, 3rd paragraph down (paragraph above "Basic Supplies"), I mentioned the finished size of the table runner is ABOUT 10" wide by 34" tall. This lack of block height mention is intentional because with hexagons, the width may be a whole number but the height will be an ugly (non-quilter friendly) fraction. In the case of this block, the finished size is 10" x 11.547".
DeleteHappy Quilting!
Buenas tardes
ReplyDeleteDónde puedo encontrar el tamaño,o dimensiones de corte de las piezas?????
Hello! At the very top of this blog post, directly under the 2 images of the 3 table runners, there is a paragraph that contains 2 links. The links will take you to Part 1: Fabric Requirements and Part 2: Cutting Directions. I'm appy to help if you need more assistance.
DeleteCan you purchase the pattern
ReplyDeleteYes, the pattern is available for purchase as a digital download. At the very top of this page in the menu, hover your mouse over '3D Quilts' (or if on your mobil device, press and hold and the dropdown menu will appear), then from the dropdown menu, select 'Easy Y Seams Pattern'. Then scroll to the bottom of the post and click on one of the photos to be taken to a secure website to purchase.
DeleteHappy Quilting!