


***Please read through, there is a lot of information here. PLEASE contact me with any questions you may have or if I am not clear. Chances are, someone else has the same question!
**For the purpose the photos, I am using a 1/2" seam, hopefully it will allow us to better see what is going on in the pictures. I am also using wedges of the same color, so they do not distract us as we tackle the spinning seams.
So, starting with the cut pieces....

On the back of one triangle, mark a 1/4" seam on the smallest point.

This is the starting point for your needle.
Grab another triangle and line them up, right sides together.

Place your paired triangles on your machine and lower the needle in the center of your mark.

So we only have to mark ONE triangle, we will use a piece of painter's tape to mark where we will line up the next triangle pair. Place one piece of tape along the right edge, so that you will be sewing a straight line along that edge. Also use a pencil to draw a line where the point of your wedge sits.

Sew your two pieces all the way down the edge to the end.
** To chain piece: after sewing one triangle pair, raise your needle, lift your presser foot and pull the triangles out from under your foot about 1/2", then repeat with lining up the triangle pairs with the tape edges for the next triangle.
Now your 8 pieces have been reduced to 4 pieces.

**IMPORTANT**
We all love to set our seams after we sew a seam, but for the Spinning Seams, I am going to ask that you DO NOT use your iron to set the seams. We will set the seams after we have finished sewing all pieces together.
Open your piece and FINGER PRESS your seams to the right side.

Repeat with the remaining 3 pieces.

Take two and place them right sides together. You want to nest your seams. You want to squeeze/slide the two seams together, and you will feel them "lock" and when you go past the spot where they need to be, you will feel them snap.

You will also want to line up the outside edges of your pieces.

Now, to sew them together:
You want to place your needle down right below the line of your previous seam, at the same time, lining up the right edge of your triangles with the edge of your tape you were using to piece the two triangles together.

Sew your two pieces all the way down to the edge. Repeat for the next two pieces.
Now your 4 pieces have been reduced to 2 pieces.

**Again, FINGER PRESS your seam to the right side. Repeat with the second piece. Take a second to make sure the seams are all going in the same direction.
Now, place your two pieces, right sides together. We will nest our seams again. The only difference is we have 3 seams to nestle instead of one... Lining up the 3 seams will make your point line up without having to use a pin to line up your points.

Once you nestle all three seams, use a pin to hold it in place. I like to insert my pin on one the side of the middle seam and come out on the other side of the seam, this way, when I get to the middle seam line when I am sewing, I can stop with my needle down, and my needle down will hold the pieces together as I remove my pin before continuing.

Sew from edge to edge.
**CAUTION**
The previous seams will push your fabric out of allignment while you are trying to sew your straight line and cause you to have a bubble when you open the two halves. You must hold it so that it does not move over when you sew.

Now your 2 pieces have been reduced to 1 piece.
Yay! Let's move to the ironing board.
Lay your block open and right side of the fabric to the board.

Notice how your previous seams are all spinning in the same direction. You want to take your newest seams and FINGER PRESS them in the same direction as well.

Here is a close-up of your center. Two of the points are crossed.


Gently uncross them.


And you will see the center of the spinning seams.
FINGER PRESS the center to give them a good crease.

Now, you can use your iron to press the whole block.


Flip it over, starch it and give it a good overall press.

Is that better?

Squaring It Up:
Square up your wheels before you add your corners.

Use your square ruler and line up your wheels' centers with the lines on your ruler. There are 3 lines on your ruler to help you. The ones that run up and and down through your center, the ones that run left and right through your center AND the 45° line that runs through your center.


You are left with a beautiful Octagon!
Making an Octagon into a Square:
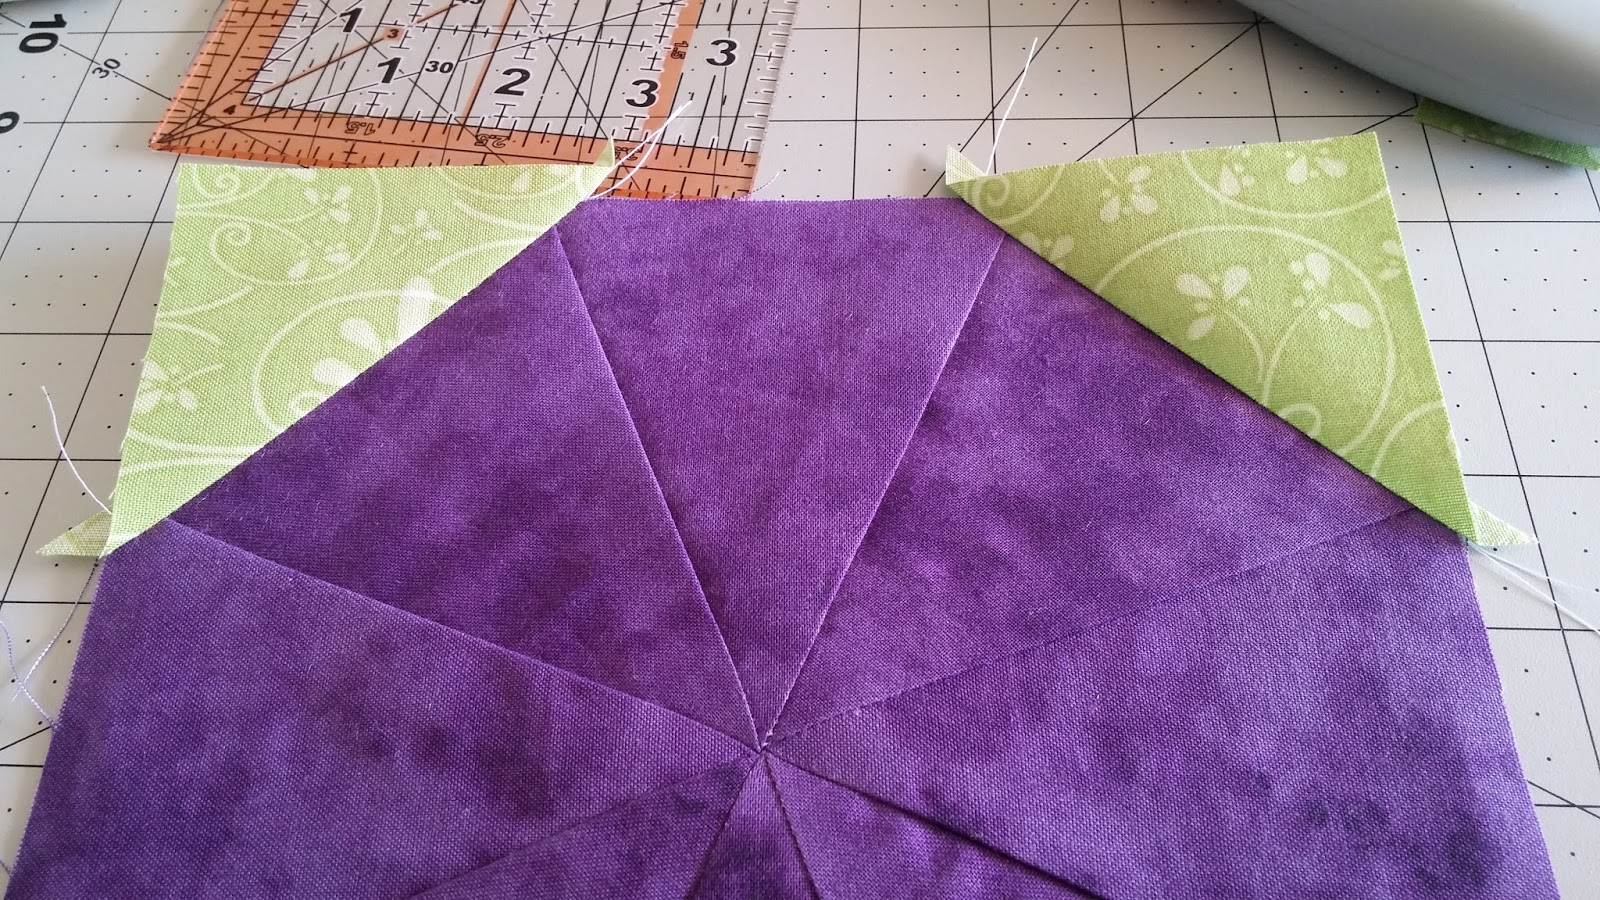
After you have squared up your wheel, use a square ruler to measure how much corner fabric you will need.

Add 1" to that measurement and cut 2 squares of fabric using that measurement. For example, if your corner measures 2-1/4 inches, cut a 3-1/4 inch square. You will have a little room for error if your seams do not measure exactly 1/4". Corners will be trimmed up after all 4 edges are sewn on.
Cut your squares on the diagonal and you will have your 4 corner pieces.

Center and line up the edge of your triangle with the edge of your wheel, right sides of your fabric together.

Sew the two pieces together.

Repeat with the other 3 corners, make sure the corners are all opposite each other.
Once all four corners are sewn, press your corners out.
Use your square ruler and square up the extra fabric that extends past the edge of your wheels.
You now have a perfectly square block that should help you in designing the layout of your quilt.

If you wish to make one like the watermelon quilt, just add sashing and cornerstones..

Update: Since typing this up, I have finished my Flower Garden Stack N Whack top. I set my wheels pin point, added a block in between and used Seminole Patchwork to make a border for the top and bottom to make it longer.


Feel free to email me: LifesAQuilt.LAQ@gmail.com Or leave a comment below.
Thank you . I think that will help .
ReplyDeleteI hope so! We have to do spinning seams with the 3D Hexagon Tablerunner, but they only have 3 seams and not 8! You will have a head start if you can master these... :) If you need to meet for hands on learning, let me know.
DeleteBTW, Which one are you? I don't remember having Dad Mom in class... Lol
Inez Hulsey
DeleteInez! Awesome! Let me know how it works out!
Delete