
There are many ways to foundation paper piece, but for me, I first learned to paper piece scrappy style. There are no set cutting directions, if it fits, I sew. It works fine and dandy scrappy style, but once I have a pattern with certain size pieces that must line up, I need to have some sort of method. There are a few paper piecing patterns out there that have set cut directions, but I wanted to show you how to make do with the many patterns that don't have cutting directions.
Join me, as I paper piece my Southwest Block.
Things you will need:
Southwest Block Paper Piecing pattern - printed
Sewing Machine
Iron
Cutting Mat
Rotary Cutter
Ruler with 1/4" markings
Fabric Pressed with Starch
Matching Thread
Fabric Glue Stick - few people like using pins, I don't.
Desk Lamp - Sun shinning through the window also works well!
Sharp Seam Ripper
Southwest Block Paper Piecing pattern - printed
Sewing Machine
Iron
Cutting Mat
Rotary Cutter
Ruler with 1/4" markings
Fabric Pressed with Starch
Matching Thread
Fabric Glue Stick - few people like using pins, I don't.
Desk Lamp - Sun shinning through the window also works well!
Sharp Seam Ripper
The first and foremost important piece of information I can offer is to make sure your printouts are printed accurately! Nothing stinks worse than getting to the end where you sew the templates together and they do not fit!
Most downloadable paper piecing patterns are a file called Adobe PDF which can be viewed on the computer through Adobe Reader. Adobe Reader has a default print option to scale the output size to fit on a sheet of 8.5" x 11" paper. Make sure this setting is set to: None.
Let's see what we are looking at. All paper piecing templates have three basic similarities.
First, all templates need to have a 1/4" seam allowance on the template. If they do, great! Cut 'em out. If they don't, cut 1/4" away from the lines on ALL sides of each piece. I've had one paper piecing pattern where the pieces were arranged as a finished block and no seam allowance was included. I had to cut them apart, tape them to a piece of paper and photo copy them with enough seam allowance. *The seam allowance is included with the Southwest Block.


Second, all templates have an order in which the fabric is placed onto the template; either by numbers or the alphabet (1, 2, 3, 4... Or A, B, C, D...).
Third, they all have straight lines on them. These lines are our sew lines. By the time we finish our template, we will have sewn on each of these lines.
Moving on, let's decide how to cut your fabric... When I cut out my fabric, it is easiest for me to have a pile of strips cut from the Width Of Fabric (WOF). So now, the question is: how wide x WOF??
Pick through your templates and decide which piece will have what color of fabric. Some patterns will have a color chart describing which pieces will go where.

Other times you may decide you want a completely different set of colors.

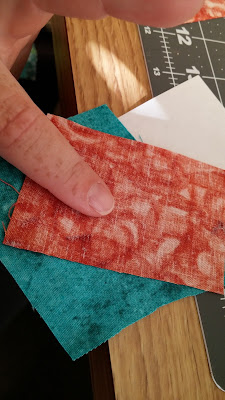
So spend a few minutes figuring out your colors. For my Southwest Block, I have chosen 4 different colors of fabric. They are not quite what the chart has, but they will work nicely. They are a tan background (TB), dark blue (DB), turquoise (TQ), and a rusty orange (RO). Write on your templates where each color goes.


Other times you may decide you want a completely different set of colors.

So spend a few minutes figuring out your colors. For my Southwest Block, I have chosen 4 different colors of fabric. They are not quite what the chart has, but they will work nicely. They are a tan background (TB), dark blue (DB), turquoise (TQ), and a rusty orange (RO). Write on your templates where each color goes.

Now you have your color scheme set up, pick your templates that have the bigest piece of each of the colors. It doesn't matter how long the pieces are, because we are using the WOF, so as long as the height is within range, we are good. For example: my Southwest Block's biggest TB pieces are 2 inches tall by some number long - in fact, all my TB pieces are 2" by some number long. My Southwest Block's biggest DB pieces are 6.5" a 6.5" and my TQ pieces seem to be only 1" tall by some lenght... Getting the hang of it?
Once you have the measurement of your biggest piece, we are going to add one inch to that number and that number will be the number you will cut x WOF. Because I don't like to waste too much fabric by cutting out more than I need, I will cut only one strip from each of the fabric colors. If I need more, I can always cut more. *for those following along with me on the Southwest Block, the cut measurements are included in your instructions.


Let's set up our sewing station. When I paper piece, I like to have an assembly line style setup, it helps make things run a lot smoother. I have my sewing machine in front of me, my desk lamp behind my machine-slightly to my right, my cutting mat to the left of my machine, my iron and board at my side to the left (from my machine, to my mat, to my iron). Yes, I press with my iron after each piece rather than finger press. I find it to be much more accurate and the pieces do not shift as much as I add the next piece. You will find what works best for you.

Lets set up your machine. Because we will have to remove the paper at some point, we need to set our straight stitch lenght to a smaller number. My machine default is set at 2, but I find tearing off paper works better at a 1.2mm lenght setting on my machine.


Lets give it a test. Take a scrap piece of paper and two scrap pieces of fabric, and layer them. Put your paper on top, the two pieces of fabric under the paper and stitch a straight line. Clip your threads and have a look see. Does your fabric fall off the paper? If your fabric falls off the paper, your stitch lenght is too short. We want the paper to stay on atleast until we have all the fabric pieces attached. Do you really have to tug at the paper to rip it off? Your stitch lenght is too long. You don't want sit there with tweezers, picking out paper. Or is it a smooth tear, like ripping out a check from a checkbook? This is what you want!
We are ready!
First, lets get something straight. My first paper piecing experience was not as smooth sailing as I had hoped. I was so frustrated with it and I messed up so bad with it, I tossed the piece in the trash and printed a new template. Yep, I started all over! Even now, I do have booboos, and it is okay. I am able to catch it in time, use my seam ripper and rip it out before I move onto the next piece.
Let's start out by picking a template, any template will work. For the Southwest Block, I'm starting with template labled C. I'm going to eyeball the size for space #1, laying the fabric right side down on the mat and placing my template (printed side up) on top of it. As long as TQ fabric covers all sides of space #1 by a 1/4", we are good to cut the fabric!


I'm going to flip my template over, dab a tiny bit of glue over the space #1. Flip my template back over and stick it to the wrong side of TQ fabric. Before the glue sets, I'm going to make sure the TQ fabric overlaps space #1 on all sides by at least a 1/4".


Now, to cut the next color. I'm going to eyeball the size of fabric I need for the space #2. Place fabric, right side down and the template on top. Fabric needs to cover 1/4" on all sides of space #2. The fabric even needs to cover 1/4" over space #1.


Let's attach! I'm going to place my to fabric over space #1, right sides of the fabric together.

When I hold my template up to the light, I'm going to line up the edge of my RO fabric 1/4" over the line onto space #2. I'm also going to make sure my fabric for space #2 extends off the edge of my paper template on both sides.


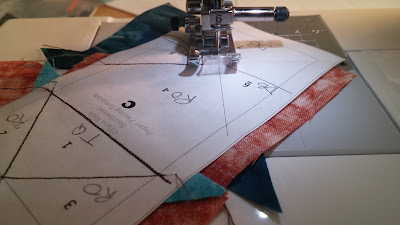
Once the edges are lined up, I'm going to carefully place my template with the fabric lined up on my machine: fabric side down, paper up - making sure none of the fabric shifts. I'm going to lower my needle into the paper at least 1/8" before the line starts. *If you are using my template for the Southwest Block, I have extended the lines for you.


Sew a straight line, as straight as you can and end at least 1/8" past the edge of your space #2. It's nice when the lines are drawn for you!


Now, we will trim off the extra fabric so we can end with a 1/4" seam between space #1 and #2. Place your fabric on your mat and fold back only the paper, using the line you just sewed as your guide.


Make sure the fabric you just sewed on is under the bulk of the paper template. Take your ruler and line up your 1/4" line with the edge of the paper.

Use your rotary cutter and trim off the extra fabric.


Open back out your folded paper and flip your template over. This is what you see.


Flip fabric #2 open and give it a good press along the seam line.


Excited yet?


Let's add fabric for space #3. We're going to eyeball the size again, making sure we cover over 1/4" into space #1 and extends 1/4" off both edges of the template.


Place the fabric over space #1, right sides of the fabric together.


Hold your template up to the light to make sure the edge of your fabric covers at least 1/4" over into space #3 AND extends off both edges of the template.


Lower your needle 1/8" before the start of your line. Sew a straight line and end at least 1/8" past the end of your line into the seam allowance.


Place your template on your mat and fold back the paper. Now, here's the catch. The line we sewed between space #1 and #2 is making the fold a tad difficult. We are going to hold the threads from the line between #1 and #2 and we are going to rip the paper from the threads, just enough to give us a straight line fold on our newest sew line between spaces #1 and #3. *Don't rip the paper off the seam you just sewed.


We're going to use our ruler and line up our 1/4" line with the edge of the fold.


Trim off the excess with the rotary cutter.


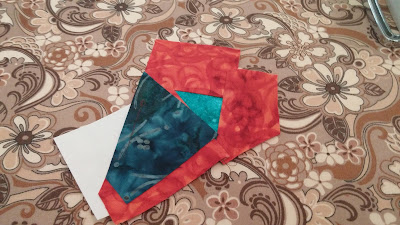
This is what it is looking like when you fold out your paper and flip it...


Fold back fabric for space #3 and give it a good press. You don't need a picture of my iron, do ya?
I'm sure excited! I now have a perfect point for my triangle!


Fabric for space #4! Lets eyeball it! Getting the hang of it? We need to make sure it is atleast 1/4" past all sides of space #4 and past the edge of the template.


We are going to place the fabric over space #1, right sides of the fabric together.


Hold it up to the light, and make sure the fabric extends over into space #4 by at least 1/4" and extends off the template on both sides.


Place on the machine and lower your needle at least 1/8" before the start of your line. Sew a straight line (I'm sure you can tell, my lines are not exactly straight EVEN THOUGH I have a straight line as my guide!). Stop at least 1/8" past the end of your line, off into the seam allowance.


Now move onto your mat, fold back the paper. Hold the threads from your previous sew lines and rip the paper so that you are left with a nice straight fold line between space #1 and #4.


Line up your 1/4" line on your ruler with your fold line.


Trim off the excess.


Fold your paper back out, flip and press fabric for space #4 open.


Woohoo! Lookin' good!
On to #5 and #6. Now that we are getting the hang of this, I'm going to introduce a fabric saving measure. Spaces #5 and #6 are small triangles, and I have a wide strip of DB fabric to cut from. I'm going to cut a rectangle of fabric, wide enough to cover all of space #5.


Then I'm going to cut that rectangle semi on the diagonal. We are left with two somewhat triangle shapes that are large enough to cover each of the two spaces #5 and #6.


Place the fabric over space #4, right sides of the fabric together. Hold it up to the light. Line up the long edge of the triangle fabric so that it overlaps the line between space #4 and #5 by at least 1/4" and extends past the edge of the template. Also: Make sure your fabric extends at least 1/4" over into space #7!!! Check fabric in space #4 is flat and has not shifted.


Lower your needle 1/8" before the start of your line.


Sew down the line and end 1/8" past the edge into your space #7.


On your mat, fold back the paper along your sew line.


Line up your ruler for a 1/4" seam allowance.


Give it a cut. But you're probably not following along now, because, you got this! I did want to bring to your attention another fabric saving measure: that piece of fabric you just trimmed off, its probably a good size piece of fabric that would fit in your template D space #2. So save those scraps you trim off, you can always use them later - if they fit.


Movin' on... Press open fabric for space #5.

Line up your fabric for space #6 by placing it on top of space # 4, right sides together.


Hold it up to the light, make sure it overlaps at least 1/4" over the line between space #4 and #6 and extends past the edge of the template. Also Make sure the fabric extends into space #7 too!


Lower your needle, sew on the line, starting and stopping 1/8" past where your sew line is marked.

Fold back the paper and rip the paper from the threads of the previous sew lines.


Line up your ruler and trim off the excess.


Press open fabric for space #6.


Eyeball your fabric size for space #7 and cut it.


Place your fabric over space #4, #5, and #6, right sides together. Hold it to the light and make sure your fabric overlaps the line between spaces #5, #4, #6 and #7. Also, make sure your fabric extends past the edges of your template.


Sew on your line.


Fold back the paper. I even managed to get a picture of how I hold the threads to rip the paper. Having long nails helps.


Trim.


And Press! Ta-da!


Now what do I do with this ugly block?? You can either continue paper piecing until all your templates are paper pieced or you can "square" up your block. I'm sure most of you are dying to square it up.
Squaring it up!
I squre it up as I would any other pieced block. With paper piecing, the paper shows you the lines to square it up with. How cool is that! The only recommendation I have is that you don't square it up with the edge of the paper. Use the 1/4" line on your ruler and line it up with the line around your finished block. Line up the top as well as your side and trim both at the same time.


Rotate your block and repeat.


Wah-la! Now you have a super nice block with all your points 1/4" away from the edge of your fabric.


Now, I'm going to jump ahead and walk you through part of template A, H, M, & R, and walk you through a couple of steps there. By the time you get to space #2, I hope to help you avoid using your seam ripper. It happens to me every time!
So here, we are going to cut and glue fabric for space #1, and use the fabric saving tip from above by cutting a rectangle and and then cut the fabric slightly on the diagonal.


Use the glue to hold the piece of fabric to space #1 and hold it to the light to make sure all edges are covered by 1/4".


Now, space #2... When you are lining up the fabric to get the proper eyeball amount, you want to line up your sew line (the line on the paper) with the edge of your fabric. In doing so, you can see that space #2 makes for quite a wide piece of fabric... Scoot your template along the edge of the fabric until the tip of space #2 (nestled between space #6 and #3) has fabric that extends at least 1/4" past the tip. Then you are safe to cut.


Oh, but wait... Don't sew yet... Let's line it up first. Even though your sew line is short, make sure that when you hold it up to the light, your fabric extends well over into space #3 so that when you press open the fabric open after you sew, it covers the tip of space #2. Ok, now you can sew...


There you go... You can put that seam ripper away now... I saved you... Fold over your fabric for space #2 and see if it fits.


I'm pretty sure you've got the hang of it now. Place your pieces on your design wall, step back and admire it for a bit... Take a picture..


Here are some mistakes I ran into while I was making this tutorial... See, I told you, I make mistakes...
Here is one, my R block: notice the top left corner? It has some paper sticking out... Not too much, so I left it. It didn't mess up my seam allowance by much. Now, if it we're closer to where my seam will be when I join my blocks, I would have to rip it out and redo that piece (I probably would have tossed it and started over).


Here is another, my I block. I didn't line up my fabric right so when I pressed the fabric for space #3 open, it didn't cover near enough what needed to be covered. Boy, it is a chore to rip out those tiny stitches.


I needed to make sure the fabric edge went past the edge of the space. See, I'm pointing to the space #3 that extends past the sew line.


When you line the fabric up right, it all works better.


Now we have a bunch of blocks. Pretty! Most paper piecing instructions will give you a set of directions that will look a lot like this. A bunch of letters, some numbers, even '+' and '=' signs!


What does it all mean?!?!?
Well, let's break it down. The letters usually represent your blocks.
 The '+' sign between the letters means you sew the two blocks together and the '=' sign is the new name of the block now that they are sewn together, usually a number. Start with the first line in the directions before you move on to the next line. The completed section in the first line will be used in another line further down in your directions.
I hope you had fun, and hopefully you'll forgive me because I know it is a LONG tutorial. Now, you will be able to paper piece any block you find! Please feel free to contact me with any questions. I would also love it if you sent me a picture of your paper pieced block, I can post it here (even if it is not the Southwest Block).
Email: pj_paco@hotmail.com
No comments:
Post a Comment